
First, you need to have an account with a VoIP Service Provider.
3CX will prompt you to conduct a firewall test. Frequently, the internet facing firewall sitting between 3CX Phone System and the VoIP Provider is not correctly configured or is not able to correctly route VoIP traffic. To check the firewall configuration, it is important to perform a firewall check using the inbuilt firewall checker. To do this:
- In the 3CX Management Console, go to the “System Status” page.
- In the section “PBX Status” select the “Firewall Check” entry.
- Click “Run.”
- Ensure that the tests for the SIP Port (default port 5060), and the Audio Port range (default ports 9000-9255) pass.
- If the firewall check fails, you must go to your firewall and troubleshoot why the test failed.
Add the VoIP Provider account in 3CX Phone System
After you have created the VoIP Provider account, you will need to configure the account in 3CX Phone System. To do this:
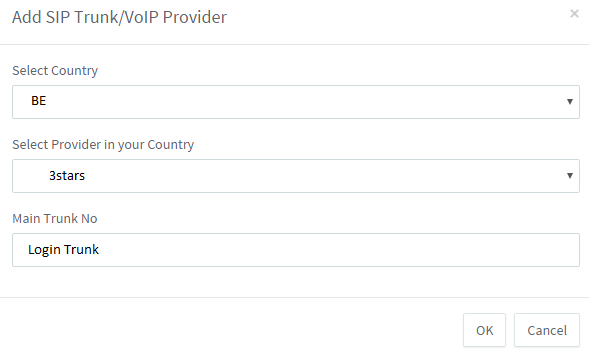
- In the 3CX Management Console menu, select “SIP Trunks” > “Add SIP Trunk.”
- Select the country that the VoIP Provider operates in.
- Select your VoIP Provider from the provider drop down list. Important: If the provider is not listed, select the “Generic”option in country drop down menu and then choose between “Generic VoIP Provider,” or “Generic SIP Trunk,” (If using a generic provider we will not be able to guarantee that 3CX will work with this VoIP Provider).
- Enter the main number assigned to this SIP Trunk. If you just have DIDs and no main number you can select one of the DIDs as the main number. Click “OK.”The SIP Trunk will be created and a new dialog will open.
- Enter a name for this VoIP Provider account. The “SIP server hostname or IP”and optional “Outbound Proxy” will be pre-filled. Compare these with the details you have received from your VoIP Provider and check that these are indeed correct.
- Specify the “number of simultaneous calls”your provider allows.
- In “Authentication,”specify whether authentication is based on IP or based on Account / Registration. If you selected a template, this will be automatically pre populated and you must leave as is. If IP-based, the password will be greyed out, since authentication is linked to your IP. The outbound or inbound only are not applicable in most cases and can be ignored.
- Specify how calls to the main number should be routed. The routing configured here will be for calls matching the main number.
- If you have DID numbers, you will need to specify these in the DIDs tab. Click on the “DIDs”tab and add the DID numbers associated with this account. The DID will be created and linked to the operator extension. You can change this later from the “Inbound Rules” node by adding an inbound rule for the DID and routing to the desired destination.
- In the “Caller ID”tab, add the caller ID you wish to have appear on outbound calls.
- Click “OK”to save the trunk settings.
- Create an outbound rule to route calls over the SIP Trunk
Comments
0 comments
Please sign in to leave a comment.